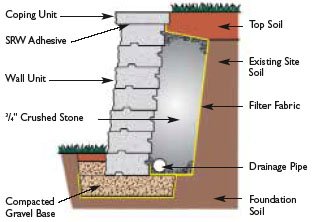
Retaining walls under 4′ high are usually built as a gravity wall, where the weight and set-back of the units provide resistance.
- Excavate a trench about 12″ deep by 24″ wide for the length of the wall. Compact the subgrade soil thoroughly and line excavated area with landscape fabric.
- Fill trench with 1 1/2″ processed gravel or 3/4″ crusher run base material and firmly compact in 2-3″ layers until base is 6″ thick.
- Place and level the first course of wall units on the base.
- Place perforated pipe behind the wall for drainage and backfill with 3/4″ crushed stone.
- Place successive courses by stacking wall units on top of the row below, staggering joints as you go.
- Depending on the style wall, units will connect and automatically step back with pins or a tongue and groove.
- Backfill with 3/4″ crushed stone behind each course and compact.
- Finish the wall by attaching coping units with Ideal’s SRW adhesive.